Showing posts with label baking. Show all posts

Sunday, March 24, 2013

Maple Oatmeal Cran-Blue-Raisin-Berry Cookies

Last night, some friends and I were discussing razzleberry. What kind of flavor is that? Usually it's just blue dye and some fruity artificial flavors.

But we decided it probably comes from raspberry and apple. And then we started thinking about cran-apple, and what would happen if you shortened that in the same way...
Crappleberry. That's what would happen. So Ocean Spray just sticks with cran-apple...it's probably a safer bet, advertising-wise.


These cookies are not crapple-icious. They look innocent and full of berries, until WHAM

Golden raisins reveal themselves among the camouflage of golden dough, ninja-like, full of stealth. Sweet, wrinkly stealth.

This is what they look like after they've been smooshed together traveling on a plane, bus, and train. Still taste amazing though!

The only downside of this recipe is that the maple flavor has a bit too much stealth. It's kind of invisible. If you want a stronger flavor, I'd suggest maple extract, or swapping out some brown sugar for maple sugar.

The extra liquid from the sticky sap contributes moisture, keeping the cookies soft, but I wonder what would happen if you replaced it with molasses, or honey. You'd probably want to decrease the amount a bit, since those are stronger/sweeter than maple syrup, respectively. But it could make a delicious change! (It also makes the dough a bit sticky, so refrigerating before scooping helps the cookies keep their shape).


Or maybe you want to play with the additions. Joy made hers with white chocolate and cranberry! I think it'd be wonderful with some toasted, slivered almonds too!

This is one of those drop cookies which takes well to almost any add-in. Pretzels. Chocolate. Dried fruit. Nuts. Sprinkles. Heath bits. Chopped up peanut butter cups. I just threw in many handfuls of small dried fruits, but you could go crazy with variations! 

P.S. Yes, that's toilet paper, AKA college kleenex

Maple Oatmeal Cran-Blue-Raisin-Berry Cookies
Yield: about 3 1/2 dozen

Ingredients:
1 3/4 cups all-purpose flour
1 teaspoon baking soda
1/2 teaspoon salt
1 1/2 teaspoon ground cinnamon
1/2 cup (1 stick) unsalted butter, at room temperature
1 cup packed brown sugar
2 large eggs
2 teaspoons vanilla extract
1/2 cup maple syrup
1 3/4 cups rolled oats
Handfuls and handfuls of bite-sized add-ins: I recommend about 2 cups worth if you want them really choc full! This version has about 1/2 cup dried blueberries, 3/4 cup golden raisins, and 1 cup dried cranberries, approximately.

Method:
  1. Place racks in the center and upper third of the oven and preheat oven to 350 degrees F. Line two baking sheets with parchment paper, silpats, foil and baking spray, etc. and set aside. 
  2. In a medium bowl, whisk together flour, baking soda, salt, and ground cinnamon. 
  3. In the bowl of an electric stand mixer, fitted with a paddle attachment (or with a hand mixer), combine butter, brown sugar, and granulated sugar. Beat on medium-low speed until thoroughly combined and slightly fluffy, about 3 to 5 minutes. Stop the mixer and scrape down the bowl.  
  4. Add eggs, one at a time, beating for 1 minute between each addition. Add vanilla extract and maple syrup and beat to combine. Add the flour mixture and beat just until incorporated. Add in add-ins and stir in by hand or let the mixer handle it.
  5. (optional) Refrigerate dough for about an hour--it really helps since, with the syrup, the dough is pretty sticky.
  6. Spoon batter onto prepared pans by the heaping tablespoonful. Leave about 2 inches of space between cookies.  Bake cookies for 10 to 12 minutes, or until golden around the edges. 
  7. Cool cookies on the sheet for 5 minutes. Remove from the pan and allow to finish cooling on a wire rack. Store in an airtight container for up to four days. 
Adapted from Joy the Baker!

Banana Bread

I call this is the kind of banana bread you make when you have an extreme number of bananas to eat, all speckledy and starches converted to sugars and whatnot. All of these bananas give amazing banana flavor to the bread, too.


There's a crumble topping too! Butter and brown sugar and a bit of flour and lots of aromatic cinnamon. My favorite bits are the pockets of banana bits that didn't get fully mashed up! So delicious.


You could of course add chocolate chips, or walnuts, or pecans, or all three! With or without the crumble topping, it's amazing. The huge amount of bananas (4 per loaf) keep the bread moist and lend a ton of flavor.


I also discovered that a smear of peanut butter, drizzle of honey, and sprinkle of cinnamon totally elevate it to something even more extraordinary, if possible. Desserty, filling, sweet, nutty, and smooth.


And if you don't have 4 overly ripe bananas at once, just peel and freeze as many as you do have. Then, thaw them in the microwave for a minute or two before mashing.


They also make excellent one-ingredient ice cream!

But back to the bread...here's the recipe! File it away for when the freezer starts screaming for ethanol-induced ripe-banana mercy.


Banana Bread
Yield: 1 loaf

Ingredients:


  • 1 1/2 cups all-purpose flour
  • 1 teaspoon baking soda
  • 1 teaspoon baking powder
  • 1/2 teaspoon salt
  • 4 bananas, mashed
  • 1/2 cup granulated sugar
  • 1 egg
  • 1/3 cup canola oil
  • 1/3 cup packed brown sugar
  • 2 tablespoons all-purpose flour
  • 1 tablespoon ground cinnamon
  • 1 tablespoon butter
Method


  1. Preheat oven to 375 degrees F. Butter and flour a loaf pan.
  2. In a large bowl, mix together flour, baking soda, baking powder and salt. In another bowl, beat together bananas, sugar, egg and oil. Stir the banana mixture into the flour mixture just until moistened. Pour batter into prepared pan and smooth top.
  3. In a small bowl, mix together brown sugar, 2 tablespoons of flour and the cinnamon. Cut in the butter or mash it in with your fingers until the mixture resembles coarse meal. Sprinkle topping over muffins.
  4. Bake for 50 to 60 minutes, or until a tester inserted into center of loaf comes out clean.
Adapted from Leftovers for Lunch.


Friday, March 22, 2013

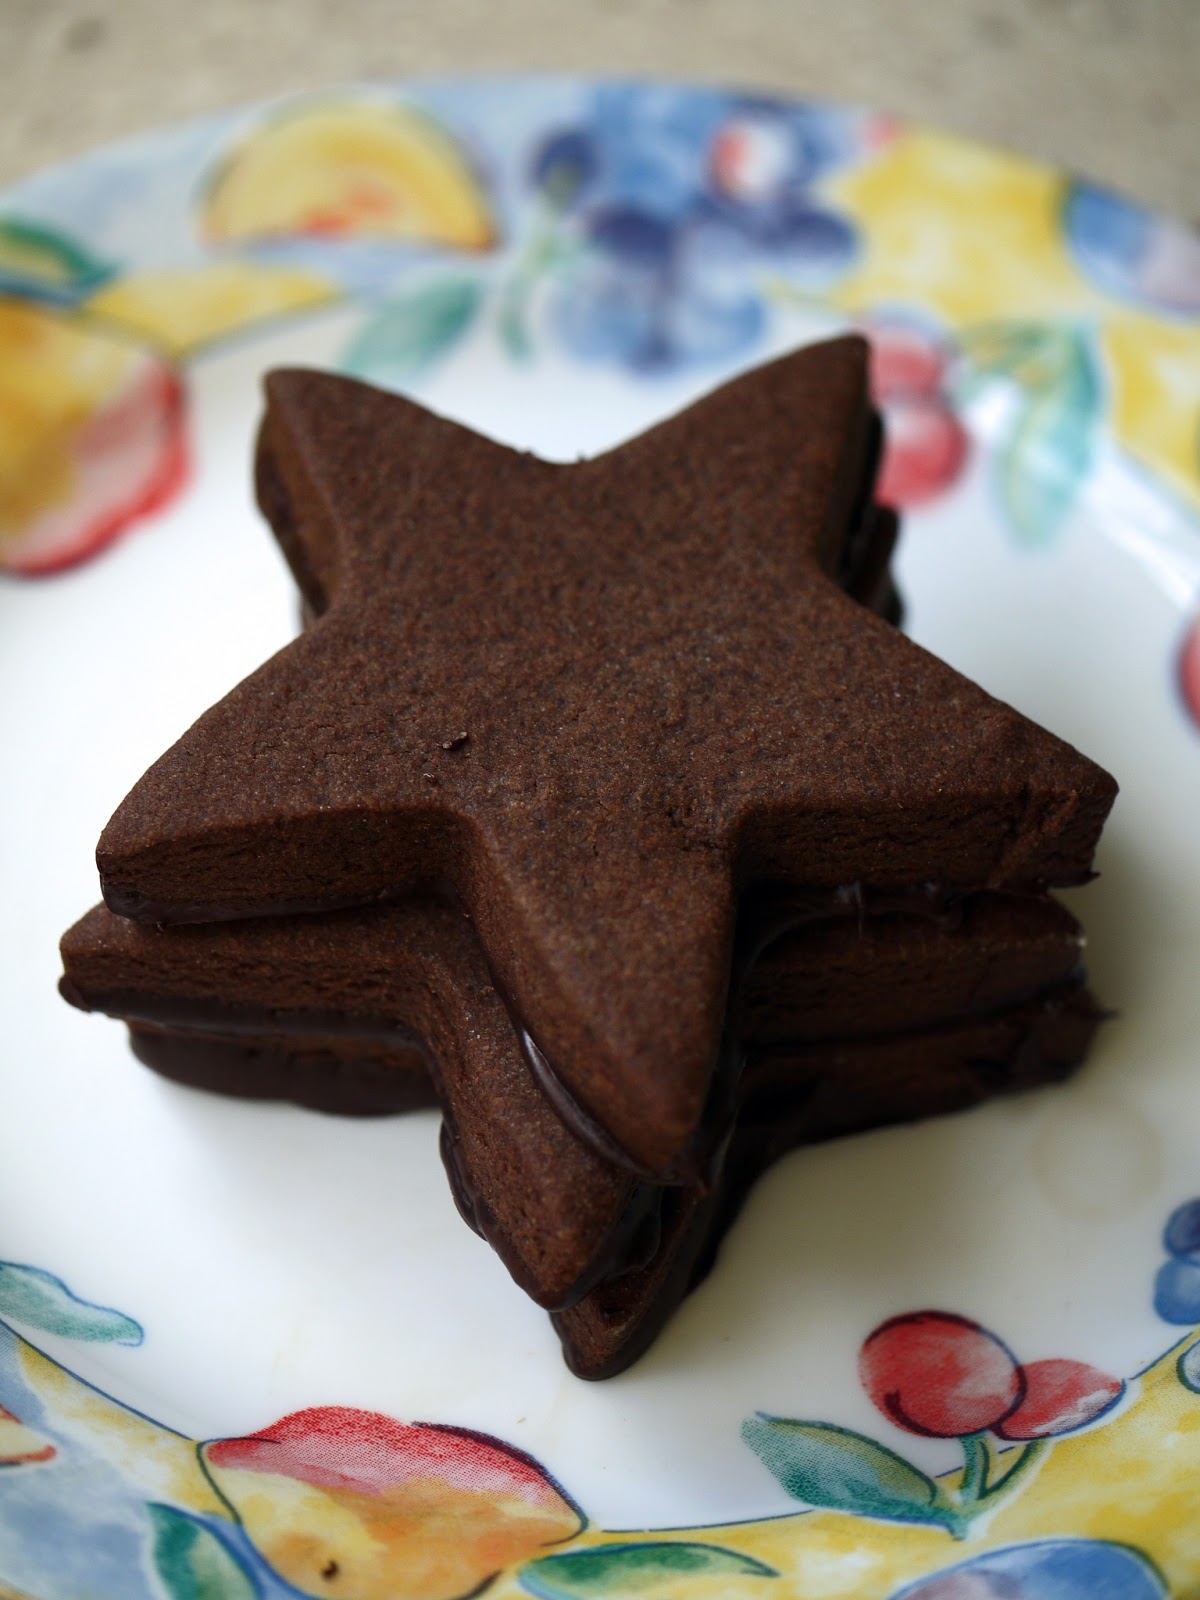
Brownie Cut-Out Cookies

These cookies are pretty amazing.


Remember how I found a peanut butter cookie for all occasions? This is the chocolate equivalent, except different. It's a cut out cookie (I know, what a pain, right? Except not, this dough is as easy as drop cookies and really easy to work with) but can serve as a base for ice cream sandwiches, soft oreos, royal icing, a dusting of powdered sugar, or a dunk in chocolate. And they're fantastic plain too...the chocolate flavor shines right through.

They're chocolaty. Simple. Dough in the amount of time it takes to measure ingredients. Roll 'em thick for chewy cookies.


You're a star if you make stars!

I wanted to make a project of this batch, since I'm home for break and have the time to bake, so I dipped the bottom in tempered chocolate. This time, I used the seed method, which means (in a nutshell), microwaving the chocolate until just all melted, then stirring in chopped chocolate until it gets down to about 90 degrees (curtesy of Baking Bites). It was slightly easier than the method I used for the peanut butter cup truffles.

Which by the way would be delicious in an Easter basket!


But I digress. Tempering chocolate is the opposite of making these cookies...it's hard, lengthy, messy, and fussy. The result, though, is amazing--chocolate which doesn't need to be refrigerated and keeps a hard, glossy coat.
Use good chocolate bars. Don't be me and use chips. It won't work as well...the chocolate still tempered, but it was slightly grainy from the preservatives and stuff they put in to make the chocolate stay melty in your fresh-out-of-the-oven chocolate chip cookies.

Really, these cookies live to serve your higher purpose. Rolled slightly thinner and sandwiched with ice cream, they're a great ice cream sandwich (I did this, except minus the rolling out thinner part, with the leftover cookies which didn't get a chocolate coating...it's pretty dang amazing). Cut into hearts for valentine's day, plain circles for lunchboxes, ruffled edges for tea parties. I bet if you added mint, they'd be like thin mints.
It's the Burger King of cookies...have it your way.


Brownie Cut-Out Cookies
Yield: 3  dozen-ish...depends on how big you make them!

Ingredients:
  • 3 cups all-purpose flour
  • 1/2 teaspoon salt
  • 1/2 teaspoon baking powder
  • 1 cup butter, softened (I'd love to see how these turn out if you melt the butter! Could be even chewier and brownie-er)
  • 1 cup granulated sugar
  • 1/2 cup brown sugar
  • 2 large eggs
  • 1 teaspoon vanilla extract
  • 1 tablespoon espresso powder
  • 2/3 cup unsweetened cocoa (I used dutch process, but Deb says you can use either; you'll just get a different flavor)
Method:
  1. Preheat oven at 350 degrees (325 if using convection). Line two baking sheets with parchment, silpat, foil and a bit of baking spray, what have you.
  2. Whisk flour, salt and baking powder in bowl and set aside. 
  3. Mix butter, sugars, eggs, vanilla, espresso, and cocoa in mixer (if your butter isn't fully softened, whip it around a bit by itself first to loosen it up, so you don't end up over-mixing the eggs to get butter chunks smoothed out later). 
  4. Gradually add flour mixture, and mix until smooth. 
  5. Split dough and wrap in plastic in two disks. Chill for about one hour, longer if you have time. 
  6. Roll out cookie dough on floured counter, 1/4 inch for thicker, softer cookies or 1/8 inch for thinner cookies, good if you're making ice cream sandwiches or like cookies a bit crisper. Cut into desired shapes, brushing extra deposits of flour off the top. 
  7. Bake on a parchment-lined baking sheet for 8 to 11 minutes (the former for 1/8-inch thick cookies, the latter for 1/4-inch cookies) until the edges are firm and the centers are slightly soft and puffed. Transfer to a wire rack to cool.
Recipe courtesy of Smitten Kitchen (it was originally Deb's mom's recipe!)

Sunday, January 6, 2013

Peanut Butter and Jelly Muffins


I am a firm believer that good desserts include chocolate, peanut butter, caramel, or coffee. And really excellent ones include two or three of the aforementioned dessert flavor enhancers.


This is not a dessert. But it is breakfast, and good breakfasts include these delectable traits as well.

The line is thinly drawn 'tween 'ssert and breakfast.

very focused.
I had a blogger date with my good friend Maxine, who writes posts that feel like cocoa and blankets and Christmas. We made these muffins. And then, we proceeded to take pictures for 15 minutes--of the muffins, of each other, instagrams, and random things around the house that struck our fancy to photograph.

She's so cute!
Then we devoured the muffins and talked about our how first semester had gone. It was an awesome time and great to see each other again!

These muffins are a peanut butter base with jam sandwiched between layers of batter. They are like the eponymous sandwich and full of comfort, with less stick-to-the-roof-of-your-mouth-osity to them. Warmed up in the microwave the next morning for breakfast? Devine.

This is how Maxine styled the muffins! I like it better than the way I did it, so you're seeing my photograph of her setup.
They're pretty healthy as well, with no added butter or oil besides the peanut butter! Which, bonus, also means the peanut butter flavor comes through strongly. Next time, I might want to add chopped peanuts to the top for a bit of crunch and extra peanut flavor.


Peanut Butter and Jelly Muffins
Yield: 12 muffins

Ingredients:
• 2 cups (10 oz) flour
• 1/2 cup (3.5 oz) granulated sugar
• 2 teaspoons baking powder
• 1 teaspoon salt
• 3/4 cup (6.75 oz) peanut butter, creamy or chunky (we used creamy)
• 1 egg
• 1 cup buttermilk (I know, I'm being a jerk. Milk works just as well since the leavening is baking powder, not baking soda).
• About 1/2 cup jelly or jam

Method:
1. Preheat oven to 350 degrees and grease a muffin tin (or put in paper liners).
2. Stir together flour, sugar, baking powder, and salt.
3. Add peanut butter, cutting into the dry ingredients with a fork until mixed and crumbly (this is the best part! So fun.).
4. Stir together egg and (butter)milk, add to flour/peanut butter mixture, and fold together until just mixed.
5. Put a spoonful of batter in each muffin cup, then a spoonful of jam, then another spoonful of batter.
6. Bake 20-30 minutes or until toothpick inserted in center comes out clean.

Recipe adapted from food.com.

Friday, December 21, 2012

Butter Fingers

These are not the butterfingers people pass out at Halloween. Nothing wrong with peanut butter crispy candy covered in chocolate, but these cookies are awesome. Lightly sweetened shortbread is jam packed full of crispy, buttery pecans. And I mean jam packed...there are basically as many pecans as there is dough, volume wise.

Rolled into finger shapes, baked, then rolled in a soft, thick blanket of powdered sugar.


Common scents: don't wear black while eating. Because that fabulousness just can't be contained.

Recipe courtesy of my boyfriend's mom, who makes these often (with good reason, too). I tried one he brought back after a break, and oh man, was I honored to get the recipe!

I made them in my grandmother's tiny kitchen while my dad made a lamb roast (yumyumyumyum.). And let me just set the scene: we're talking the grandmother who melts a See's candy on her toast for breakfast. She loved them, as did the aunts, uncles, cousins, and other family members who passed through her living room throughout the week and were greeted with a hug and the leftover chinese takeout container full of cookies.


Another plus of being at my grandmother's house is that she has beautiful china. She collects teacups and saucers, so as you drink cups and cups of tea--I love tea--you get to enjoy the unique patterns and delicate handles.

Saucers make great cookie plates, because the dainty cookies look substantial in comparison to the small size of the plate and beautiful against the similar daintiness of the china.


These few ingredients leave a strong impression of butter and sweetness and crunch and holidays.

Butter Fingers
Yield: about 3 dozen

Ingredients:
1 cup (2 sticks) unsalted butter
1/2 cup powdered sugar
2 cups flour
2 teaspoons vanilla
2 cups (one 8 ounce bag) chopped pecans
about 1 1/2 cups powdered sugar (to roll the cookies in)

Method:

  1. Preheat oven to 325 degrees.
  2. Cream the butter, then add the 1/2 cup powdered sugar a tablespoon at a time.
  3. Add in the flour and vanilla, mixing until just combined. Then, add the pecans and mix to combine.
  4. Roll 1 tablespoon-ish of the dough to make "finger" shape.
  5. Bake for 15-20 minutes, until firm. Remove from oven and let cool for about 5 minutes on the baking sheets.
  6. Carefully roll the still-warm cookies in the powdered sugar. Note: If they crack, it's chef's treat! It helps to press the sugar onto the cookies from all sides. Coat completely so the cookies are entirely white.
  7. Eat up!