Showing posts with label breakfast. Show all posts

Sunday, September 18, 2016

Banana Granola

Hello! I hope you are feeling as sunny and warm as the bay area was today!


Even if not, though, this granola will bring the sun inside. Our whole house smelled like the most glorious baking for aproximately 6 hours. The granola was not even baking for an hour, but its fragrance lingered in a wonderful way.


My housemates and I hovered over the pan all morning, grabbing bites here and there. You can also make this delicious, crunchy, addictive granola to give away as gifts (I don't know anyone who wouldn't be thrilled with a bag of their own!). It's easy to make and a crowd pleaser.


The golden clusters are hearty from banana, oats, and slivered almonds, and indulgent with coconut oil, honey, and a long caramelization time in the oven! It's great over yogurt with banana and honey.

Also, this was my first time baking with coconut oil...I loved how it complemented the sweet, toasty flavors of this granola. I will definitely be using it again in the future!


Banana Granola
Yield: About 5 cups of granola

Ingredients:
  • 3 cups rolled oats (no quick oats here--the texture is important!)
  • 1 cup (or more) puffed rice
  • 1 cup slivered blanched almonds (I got mine at the bulk bins at Safeway)
  • 1 tablespoon brown sugar
  • 1/2 teaspoon coarse sea salt
  • 1/2 tablespoon cinnamon
  • 1/4 cup (50 g) coconut oil
  • 1/4 (approx 85 g) maple syrup, agave or honey if not vegan
  • 1 teaspoon vanilla extract
  • 1 1/2 ripe bananas, mashed
Method:
  1. Preheat oven to 350 degrees F, convection if you have it. Line a rimmed baking sheet (or two, if you have two) with foil or parchment paper.
  2. Mix oats, puffed rice, almonds, brown sugar, salt, and cinnamon together in a large bowl.
  3. In a small saucepan or microwave container, melt together coconut oil, syrup/honey, and banana. Stir in vanilla extract.
  4. Pour wet ingredients over dry and mix well to combine. Spread on prepared baking sheet(s).
  5. Bake for 25-35 minutes, or until the granola is well caramelized and mostly dried. Since there's more banana, it might take longer to dehydrate than normal granola, but stick with it.
  6. *Note: if you like more clumps, don't stir the granola, but be aware that if you only have one baking sheet like me, the edges will probably burn before the middle is dried out, so you might have to take the cooked parts out while you wait for the middle to dry.
  7. Serve with yogurt, honey, and more banana! Or...eat handfuls...
A few notes:
The recipe did seem a bit sweet for my taste, so the recipe above is adjusted to have a slightly reduced quantity of sugar/honey.
I also love to include puffed rice in granola (I found it at whole foods, though I'm sure it's available elesewhere too--or try rice krispies!) since it lightens the mixture. Next time, I'd probably add some more, or change the ratio with oats, so use as much or as little as you would like!

Adapted from Minimalist Baker

Sunday, October 18, 2015

Orange Muffins [Guest Post]

Special thanks to Ethan for his guest post today about orange muffins! He's got a kitchen and the real life schedule and necessity to cook, so he does a lot more than I do during the school year. Take it away!

Guest post here by Ethan, an avid follower of Common Scents Baking.


I made orange muffins out of dessert cookbook I picked up when I spent a summer in Bolivia. The recipe uses the juice of two oranges, which in Bolivia, are probably far cheaper than the cup of sugar that serves as the rest of the sweetening. When I first made the recipe, I used a loaf pan, since I didn’t have muffin tins. 

Orange Loaf, made in Bolivia!
Today, I made them as muffins and they were just as good. Recommendation: fill muffin tins about 2/3 of the way to leave room for the baking powder rising action. Would also be good with an orange frosting, but are fine plain—not too sweet!


Strangely, the result didn’t really brown either time I made the recipe. Maybe the orange juice, which did color the batter slightly yellow, inhibited browning.

Cooking playlist: Danilo Perez’s two most recent albums, Panama 500 and Providencia, plus a smattering of a new Spotify playlist I made called “Miles Davis through 1970” (yes it took the length of two albums to bake and clean up…)

feat. Tag sale tin canisters


Here is the recipe, translated as best as I could into English:

Pastelitos de Naranja (Orange Cupcakes)
Makes 15-20 muffins or one loaf

Ingredients:
  • 4 tbsp butter
  • 1 cup sugar
  • 2 ½ cups sifted flour
  • 3 eggs
  • ½ cup milk
  • 3 tsp baking powder
  • 1 tsp salt
  • 1 tsp orange essence or juice of 2 
  • 1 spoonful grated orange peel
Method: 
  1. Preheat oven to 350° F
  2. Separate the eggs and beat the whites to form stiff peaks
  3. In a mixing bowl, soften the butter, add the sugar, and cream together
  4. Add the milk and egg yolks bit by bit
  5. Add the flour, baking soda, salt, orange peel and juice, and mix well
  6. Add the beaten egg whites and mix to obtain a uniform dough
  7. Pour the dough into a greased muffin tin and bake for 20 minutes.
P.S. Here's the recipe in Spanish, if you're interested:


Sunday, August 2, 2015

Caramelized Peach and Lavender Scones

This weekend I visited friends and had basically every sunny summery experience that tends to be curiously absent in foggy San Francisco (what's up, Karl?). My friend Caroline kindly lent me her air mattress to crash on, and when we woke up we mozyed over to whole foods and the farmer's market to get ingredients for breakfast.


I think you can tell a lot about a person by the type of eggs they buy. I'm a $3 egg kind of person, but all due respect to those who are $9 egg people. (again, hello SF). You can also tell a lot about a person by the way they like their eggs cooked...mostly I think I just really like runny yolks. But for some, it is strangely accurate.


Anyhow, we ate scrambled eggs with cheese while waiting for the peaches to roast for these scones. I'm not going to say the scones are quick to make, but they are fairly simple, and the complex, flowery, and fruity flavors are well worth the wait. Also, by the time they come out of the oven, you can count elevensies as brunch, breakfast, and lunch.

(P.S. Whole foods sells lavender in a little package for about $3...a price I was happy to pay over the $8 we were quoted at the farmer's market! Again, you can tell a lot about a person by their grocery shopping strategies and habits)

The recipe starts with three peaches, sliced and coated in olive oil and brown sugar. Good things are starting.


Then, butter is rubbed into the dry ingredients. It's my favorite part...get your hands in there! Then come the peaches, soft and caramelized, and buttermilk (or milk curdled with lemon juice, in our case). A gentle stir and slight bit of kneading, and then the dough is ready to form straight on the baking sheet.
This could be the same baking sheet as you used to cook the peaches.
Got that? One baking sheet, one bowl!

The scones are done pretty quickly, in 15 or so minutes, and then a glaze is made with a few leftover caramelized peach slices. These scones rocked my world! They're rich and almost cake-like, not too dry and crumbly, and full of summery peach flavor and sophisticated lavender. It's a treat...treatyoself!


Caramelized Peach and Lavender Scones
Yield: 8 big or 12-16 smaller scones

Ingredients:

  • 3 peaches, sliced
  • 2 tablespoons olive oil
  • 3 tablespoons brown sugar
  • 3 1/4 cups all-purpose flour
  • 1/3 cup sugar
  • 1 tablespoon culinary lavender
  • 2 1/2 teaspoons baking powder
  • 1/2 teaspoon baking soda
  • 1/2 teaspoon salt
  • 3/4 cups (1 1/2 sticks) cold unsalted butter, cut into cubes, or grate frozen butter on a box grater for easy handling!
  • 2/3 cup buttermilk (or milk with a scant tablespoon of lemon juice)
  • 2 teaspoons vanilla extract
  • milk or cream, for brushing and glazing
  • sugar (coarse if you have it), for sprinkling
  • 1 to 2 cups powdered sugar

Method:

  1. Preheat oven to 400 degrees F. Toss peaches with olive oil and brown sugar, then spread in a *rimmed* baking sheet or other baking pan with sides. Roast for 35 minutes, stirring halfway through. 
  2. Mix together all dry ingredients in a large bowl. Rub the butter into the dry ingredients with your fingertips (or your usual method) until chunks are about the size of peas. Toss in three quarters of the peach slices and stir to combine.
  3. Add buttermilk and vanilla extract, then stir until a soft dough forms. Near the end, reach in the bowl and knead a few times to help incorporate all the dry ingredients. Turn out onto a baking sheet, and either form into two smaller disks or one larger disk. Cut each disk into 6 or 8 slices and separate the scones from each other by pulling the wedges away from the center of the circle.
  4. Bake for 12-16 minutes (depending on size), in that same 400 degree oven, until golden brown around the edges. 
  5. To make the glaze, mash up the remaining peach slices with a tablespoon or so of milk. Slowly add powdered sugar until the consistency is to your liking, then smother the scones in glaze and chow down!
Recipe from How Sweet It Is.

Monday, December 22, 2014

Popovers

POP!

Pop goes the weasel!

Pop on over for a spot of tea, love!

I gave my peonies a bit of water, and they popped right back up.


All good things pop. Bubble wrap. Impatiens seed pods. Popcorn. The fanciest of Christmas cards. A splash of color with that dashing pocket square. What some people call soda. 

These popovers are among the better things in life. Crunchy on the outside, stretchy and soft on the inside, with big holes for marmalade. A short list of ingredients, combined in a blender. 


I will admit, I kind of messed these up. I didn't have faith that they would pop because they were hard to fill evenly, and the oven wasn't the right temperature (my fault), but lo and behold, they popped and were lovely.

Thank you, Mom, for ensuring me that they would pop. You were, as always, right.

Merry Christmas! Happy Hanukkah! Joyful Holiday Season!

It's the star on top of the Christmas tree!
Make these for family, make them when you want to feel impressive. Make them when you need to pop! 

Popovers
Yield: 6 popovers or 10 popovers made in a muffin tin

Ingredients:
  • 2 large eggs
  • 1 cup milk (original recipe calls for whole milk, but any will do)
  • 1 cup (5 ounces) flour
  • 1 tablespoon butter, melted
  • 1/2 teaspoon salt
  • vegetable oil for the pan
Method:
  1. In a blender, blend eggs and milk until smooth. Add salt, flour, and butter and blend again until smooth and bubbly. Scrape down the sides of the blender to make sure no flour lumps are stuck, then blend again and leave to rest on the counter for half an hour.
  2. While the batter is resting, preheat the oven to 450 degrees. Put a half teaspoon of oil into each cup of the popover pan or the outer 10 cups of a muffin pan. During the last 10 minutes of resting the batter, put the pan (with the oil in it) into the oven to heat through. 
  3. Quickly, take the pan out of the oven and fill the cups evenly (just the outer ones if you're making these in a muffin tin). This is tricky, so work carefully and start by underfilling. It can help to pour the batter into a measuring cup with a spout before filling. 
  4. Bake for 20 minutes, then turn the heat down to 350 degrees without opening the door. By this point, the popovers will have popped! Bake another 15 minutes at this lowered temperature, or until golden brown. Turn out onto a wire rack and let cool slightly before serving with jam, marmalade, or simply plain.

P.S. I also highly recommend these cookies from Joy the Baker!


Saturday, June 7, 2014

Blueberry Scones

Oh, how simple. 

Just blueberries in a basic scone base, supported by our good friends maple syrup, nutmeg, and vanilla. Cushioned in buttery, flaky dough, they burst and ooze purple juice in a hot oven.


I made these scones this morning, and we ate them an hour later. While I'm not as practiced at scone methodology and measurement as I am with cookies (I've got the formula down pat!), they're still pretty easy, and I'm gradually getting into it. 

To summarize, though, here's how scones go:
mix together dry ingredients
"cut in" cold butter, cubed (cut the stick in half lengthwise both ways, like you're julienning it, then cut cubes crosswise)
mix together wet ingredients
add to dry ingredients and hope that catastrophic happens while you try to mix as little as possible to avoid errant gluten developement but get everything evenly mixed
pat into a round of dough on a floured surface
cut with rounds, squares, a knife, whatever floats your summery sailboat
bake for 15-20 minutes, ish


Okay, that gluten part is perhaps a bit more dramatic then it really is...'cause I swear these are easy! In fact, I made pie crust for handpies with a friend a few weeks back, and was totally surprised at how easy it is to work in butter by hand, and mix a dough without "overmixing" – that feared, never-forgiven sin of pie crust and other buttery doughs. 

I've discovered you can knead the dough a bit by folding it and pressing down on itself is a really good way to simultaneously make lovely flakes of butter, keep the dough delicate and lightly mixed, and work in the last bits of flour which invariably hang out at the bottom of the bowl.


So, after that complicated diatribe on my fear of overmixing...the point is that yes, you can make scones by hand, in a mixing bowl, without a pastry cutter or food processor, and they will be tender and flakey and delicious! Rubbing butter between your fingertips is possibly the most therapeutic of kitchen activities (unless you're angry, in which case you might want to go with spatchcocking a chicken or kneading pizza dough by hand).


Without further ado...

Blueberry Scones
Yield: 15, 2 inch round scones

Ingredients:

3 cups all-purpose flour

2 1/2 teaspoons baking powder

1/2 teaspoon baking soda

pinch of freshly grated nutmeg

3/4 teaspoon salt

3/4 cup cold unsalted butter, cut into small cubes

1 large egg, lightly beaten

2 tablespoons maple syrup

2 teaspoons vanilla extract

3/4 cup buttermilk (or 2 teaspons of lemon juice with enough milk to make 3/4 cup)

1 cup fresh blueberries

buttermilk or milk for brushing the tops of the scones before baking

granulated or sanding sugar for sprinkling on top before baking

Method:

1. Preheat oven to 400 degrees F.  Line a baking sheet with parchment paper or a baking mat and set aside.

2. In a mixing bowl, sift together flour, baking powder, baking soda, pinch of nutmeg, and salt.  Cut in butter (rubbing it into the mixture with your fingertips) until mixture resembles a coarse meal.  Some butter pieces will be the size of peas and some will be the size of oat flakes. In another bowl, combine egg, maple syrup, vanilla extract, and milk and beat lightly with a fork.  Add to flour mixture all at once, stirring enough to make a soft, shaggy mass of dough.  Fold in the blueberries.

3. Turn out onto a floured board and knead, folding and pressing, until the mixture comes together (some blueberries may burst, that's okay. If they make the dough wet, just add a bit more flour and keep folding them into the interior of the dough).  Roll or pat out into a 1-inch thickness.  Cut into 2-inch rounds using a round cutter or cut into 2×2-inch squares.  Reshape and roll dough to create more scones with excess scraps. 

4. Place on an ungreased baking sheet.  Brush lightly with buttermilk or milk and sprinkle with sugar.   Bake for 15-18 minutes or until golden brown on top.  Eat and enjoy!

Note: I tried freezing a few unbaked scones, but haven't baked them yet. I'll let you know how they turned out when I do!

Recipe courtesy of Joy the Baker (http://joythebaker.com/2013/03/maple-blueberry-scones/)

Tuesday, November 26, 2013

Cinnamon Caramel Pinwheels

Mmmmmm. I'm home for Thanksgiving! With everyone home and an amazingly well stocked kitchen and a post-college wind-down cold Ugh. I've basically lost my voice, but I can still bake as long as I wash my hands all the time. And no coughing or sneezing.


But listen up, y'all, 'cause these pinwheels are poppin'. A thick, buttery, brown sugar caramel sauce envelops the bottom (and later becomes the top) of a pan of light, fluffy, quick-baking, biscuit-dough cinnamon rolls. No separate glaze to make, just melt it together in the microwave and dump in the pan before the rolls go in.

This is the only picture of the finished rolls that I could, with a good conscience, show you. The others look like a pile of brains.
There are a lot of ingredients in this recipe that you might not keep in stock. Buttermilk, sour cream, and cake flour. Luckily, these are easily substituted for and the results were great. I used greek yogurt for the sour cream (not for health--there's so much butter in these it wouldn't make much of a difference--but because it's what we had). One Fage is a cup, which is exactly what this recipe calls for!
I also used some milk and a squeeze of lemon juice for the buttermilk, and flour with a teaspoon of corn starch for the cake flour.


Soft soft dough with warm, chewy caramel soaked in. Sweet sticky rolls for a decadent breakfast!

Cinnamon Caramel Pinwheels
yield: 9 rolls

Ingredients:

  • 4 tbsp unsalted butter
  • 2 tbsp honey
  • 1/2 cup packed brown sugar
  • 2 cups minus 1 tbsp all-purpose flour 
  • 1 tbsp cornstarch
  • 1 tbsp granulated sugar
  • 1 tsp baking powder
  • 1/2 tsp baking soda
  • 1/2 tsp kosher salt
  • 6 tbsp unsalted butter, melted
  • 1 cup sour cream or greek yogurt
  • 1/4 cup buttermilk (or just shy of a 1/4 cup milk plus a squeeze of lemon juice)
  • 1/4 cup granulated sugar
  • 1 tsp ground cinnamon (you could probably use more, they weren't that strong with this amount)
  • 1 tbsp unsalted butter, melted
Method:
  1.  Preheat oven to 350 degress and put a rack in the middle. Make a parchment paper round to fit in the bottom of a circular cake pan, then grease the whole thing with spray. 
  2.  Put honey, butter, and brown sugar in a microwaveable bowl or measuring cup and microwave until melted and easy to stir. Stir to combine, pour this glaze in bottom of prepared pan. Rinse this bowl (we'll use it soon).
  3.  Sift together flour, cornstarch, 1 tbsp sugar, baking powder, baking soda, and salt (Note: kosher salt is much less dense than table salt, so use less than the recommended 1/2 tsp if using normal table salt!). In the same bowl in which you stirred together the glaze, mix 6 tbsp melted butter, the sour cream or yogurt, and the buttermilk or substitution. 
  4.  Put half of the flour mixture aside in an extra bowl, then add the wet ingredients to the dry and mix gently to combine. Then, add in the remaining flour mixture, and mix (hands help here) to form a shaggy dough. Dump out on a clean counter and knead a few times until it comes together.
  5.  In a small bowl, mix 1/4 cup sugar and the cinnamon. Press the dough out approximately into a 12x9" rectangle and brush with the 1 tbsp melted butter, leaving 1 inch on one of the long edges for sealing the dough. Sprinkle the butter completely with cinnamon sugar and roll up the dough, starting at the edge that doesn't have the 1 inch margin. Roll as tight as possible, and seal by pinching the dough together at the end. 
  6.  Cut dough into 9 pieces (about equal) and lay in pan with two rolls in the middle and seven rolls around the perimeter. Bake for 25 minutes, or until golden and firm to the touch. Let rest 5 minutes, then flip onto a serving plate and remove the parchment. Serve warm!
Recipe from Fast Breads, via Serious Eats.

Thursday, November 21, 2013

Dining Hall Hacks

Get ready. Thanksgiving is coming!

I'm sure your feeds are packed with stuffing, pies, brussels sprouts, turkey tips, tablescapes, and more. This is not that.

This is a collection of my dining hall creations, ways to make meals special and your own with just the microwave and toaster available. Obviously I'm doing this from the perspective of my dining hall, so you probably have different food and equipment available, but if you live in a house and have a kitchen and stuff, these are still great hacks!

I've spared you the experiments that didn't work, like olive oil on vanilla ice cream...just, don't do that.

On to the list...

Microwave:

  • Warm (cold) cereal: Heat up milk before putting it on your cereal. Great for mornings when it's chilly but you still want the taste of your favorite cold cereal. Be warned, the cereal gets soggy faster this way! (Granola this way is like the sweetest, crunchiest, yummiest oatmeal you ever had).
  • Apple dip: peanut butter, honey, and cinnamon heated in the microwave, dip sliced apples in this!
  • Makeshift apple pie: "dice" up an apple as well as you can with the knives available. Mix with butter, brown sugar, and cinnamon and microwave for 3 minutes, stirring halfway through. Add granola on top for crust if you want! (Thanks to Emma for showing me the beauty of this!)
  • Custard sauce: (I haven't actually tried this one, but I imagine it would be wonderful) Heat up a small scoop of vanilla ice cream, then add a slice of cake on top. Boom, instant custard sauce.
Toaster:
  • Toast: This is important. Toast it to your liking, even if that means putting it through the toaster twice. It is worth it
  • Butter and Jam. I forget how dang good this is. Or just butter and salt!
  • Tartine: Cut a big hunk of any bread that isn't presliced, and cut it in half lengthwise as if to make a sub sandwich if it's baguette style. Toast, add whatever toppings you like
Other:
  • Yogurt dip: Mix the plain yogurt with the fruity/vanilla yogurt for a less sweet flavor, use as a dip for fruit (melon is great)
  • Tropical Oatmeal: Oatmeal with brown sugar, pineapple, and coconut shreds
  • Coffee S'mores Dessert: Coffee ice cream with chocolate syrup drizzle and golden grahams. Best dessert ever!
  • Soup as a sauce: ladle it on rice/potatoes/pasta, meat, or veggies as a sauce
  • Soup with your own extras: Add in rice/potatoes/pasta, meat, or veggies. I want to try wilting spinach from the salad bar into soup at some point...  (the only difference between these last two is proportions)
  • Vinaigrette: combine about 1 tablespoon oil, about 1 teaspoon vinegar, and a squeeze of mustard with a fork in a to-go cup. Make twice as much and share with a friend!
  • No-Mayo Coleslaw: cabbage, shredded carrots, and any other veggies you like, with vinaigrette (or homemade vinaigrette, see above!)
  • Carrot Raisin Salad: shredded carrots, raisins, pineapple, yogurt, and cinnamon. My dad makes this so it tastes like home...a sweet way to get some veggies and pretty healthy, all things considered! Make in a mug or cup, this is pretty dang dense.
  • Chopped Salad: Get two bowls, make a salad in one of them. Go at it with fork and knife, then put the extra bowl over the first one to make a spherical shaking vessel. Shake shake shake!
  • Cream cheese on any sandwich instead of mayo
  • Egg sandwich: toast, eggs, and cream cheese. Toast can be a bagel. This is a really great brunch to get from 11am to 5pm studying on a Sunday.
  • Trashy waffle: Peanut butter, jam, and/or nutella on a waffle.
  • Mocha: Half coffee, half hot chocolate
  • Virgin Mimosa: Soda water and OJ

Yes, I have dedicated a whole section to the toaster. I feel strongly that waiting for your favorite done-ness of toast is always worth it. It's one of the ways, as a college student, that you can have control over your food.

Happy Thanksgiving! More recipes to come as I am home and baking again next week!

Wednesday, August 14, 2013

Muesli

Muesli is the homely sister to glamorous granola. It's got none of that oil/maple syrup nonsense, just toasted oats and whatever add-ins you like.

There's this great thing people love called overnight oats--it calls for soaking oats in water/milk overnight so they're softened in the morning, and it's great for summer because you don't have to heat it up.
But, I've never much liked it.

And I think I've figured out why...the oats aren't cooked! In muesli they're toasted, and in the other applications like oatmeal and oatmeal cookies. Those cookies that are chocolate and peanut butter mixed with oats have always had a weirdly raw taste to me, too (though that's not to say you wouldn't love them...peanut butter and chocolate are mostly always delicious).


Muesli is different. There's a pop and satisfying dry crunch you don't get with raw oats. Plus, dried fruit and nuts make it delicious!

Oh, and it's healthy. That's the other selling point. Mine had walnuts (omega 3s and protein), chia seeds (omega 3s, fiber, and protein), and loads of oats (fiber! or fibre if you're fancy).
You can just add raisins and peanuts or whatever you have. Mostly, healthy things go with healthy things, and it's hard to go wrong.

It's great on yogurt (mix it the night before if you're into softened oats, the day of if you like that dry crunch/pop) with a drizzle of honey or maple syrup. Sliced banana makes another great addition! Or just with milk as cereal...the options are many.

Muesli
Yield: as much as you like

Ingredients:
  • Oats
  • Nuts
  • Seeds
  • Dried fruit
  • Spices (cinnamon, nutmeg, ginger...)
Method:
  1. Preheat oven to 350 degrees F. Spread oats in a baking sheet (it's okay if there's a layer that's a bit thick; mine was about half an inch thick in some places). Bake 10-15 minutes, or until toasted the amount you like. They don't burn that easily, but keep an eye on them!
  2. Let cool a bit, then mix with fruit, seeds, nuts, and spices to taste. A crucial part of this is separating the clumps of dried fruit bits and covering them in the oat dust so they don't stick together...this makes for more even bites.
Adapted from Joy the Baker (who adapted from Food52 and adds toasted coconut)

Sunday, January 6, 2013

Peanut Butter and Jelly Muffins


I am a firm believer that good desserts include chocolate, peanut butter, caramel, or coffee. And really excellent ones include two or three of the aforementioned dessert flavor enhancers.


This is not a dessert. But it is breakfast, and good breakfasts include these delectable traits as well.

The line is thinly drawn 'tween 'ssert and breakfast.

very focused.
I had a blogger date with my good friend Maxine, who writes posts that feel like cocoa and blankets and Christmas. We made these muffins. And then, we proceeded to take pictures for 15 minutes--of the muffins, of each other, instagrams, and random things around the house that struck our fancy to photograph.

She's so cute!
Then we devoured the muffins and talked about our how first semester had gone. It was an awesome time and great to see each other again!

These muffins are a peanut butter base with jam sandwiched between layers of batter. They are like the eponymous sandwich and full of comfort, with less stick-to-the-roof-of-your-mouth-osity to them. Warmed up in the microwave the next morning for breakfast? Devine.

This is how Maxine styled the muffins! I like it better than the way I did it, so you're seeing my photograph of her setup.
They're pretty healthy as well, with no added butter or oil besides the peanut butter! Which, bonus, also means the peanut butter flavor comes through strongly. Next time, I might want to add chopped peanuts to the top for a bit of crunch and extra peanut flavor.


Peanut Butter and Jelly Muffins
Yield: 12 muffins

Ingredients:
• 2 cups (10 oz) flour
• 1/2 cup (3.5 oz) granulated sugar
• 2 teaspoons baking powder
• 1 teaspoon salt
• 3/4 cup (6.75 oz) peanut butter, creamy or chunky (we used creamy)
• 1 egg
• 1 cup buttermilk (I know, I'm being a jerk. Milk works just as well since the leavening is baking powder, not baking soda).
• About 1/2 cup jelly or jam

Method:
1. Preheat oven to 350 degrees and grease a muffin tin (or put in paper liners).
2. Stir together flour, sugar, baking powder, and salt.
3. Add peanut butter, cutting into the dry ingredients with a fork until mixed and crumbly (this is the best part! So fun.).
4. Stir together egg and (butter)milk, add to flour/peanut butter mixture, and fold together until just mixed.
5. Put a spoonful of batter in each muffin cup, then a spoonful of jam, then another spoonful of batter.
6. Bake 20-30 minutes or until toothpick inserted in center comes out clean.

Recipe adapted from food.com.

Wednesday, January 2, 2013

Buttermilk Scones and Soft Boiled Eggs


I'm going to be that person. The one who posts a recipe with "buttermilk" in the title, even though goodness knows most people don't go through enough buttermilk to make it worthwhile to stock in a home kitchen. Substituting in milk with lemon juice works, but it feels a bit like cheating, especially in something like pancakes where buttermilk is in the title.

What am I doing presenting you with a recipe that includes buttermilk, then? Well, I have a strong inclination to use up whatever unusual ingredient we happen to have in the house, and buttermilk is unusual for us to stock. My dad got some for these scones, and you can bet I'll be making pancakes at some point because the buttermilk is there, begging to be used up.


Since buttermilk is not the most important ingredient in these scones, even though it's in the title (for the sake of those people dying to use up the languishing carton in their refrigerator), and since I do not mean to impose upon you the same buttermilk-induced guilt I often find myself struggling with, feel free to use the milk/lemon juice trick or yogurt and milk.

In fact, that's what this recipe is about: substituting and making it your own. We had dried blueberries and cranberries and fresh tangerines, you might have currants and grapefruits or raisins and almonds or some other dreamy combination.

The good thing is that scones make a lovely backdrop for your creativity. They're behind you, 100%.


I mixed up the dry ingredients, cut in the butter, and separately mixed the wet ingredients the day before and stashed it all in the fridge overnight. The next morning, I zested a clementine and added the wet ingredients, formed and baked. It was a super easy, chill thing to make for guests at breakfast.

Look at this parallelism...bookended! But with a different focus.
And let's talk about that egg...maybe you've been admiring it. Maybe you've been thinking, "I make a better egg than that. That girl, she's a bad egg." Well hardy har har, how punny of you!

It's a soft boiled egg, and the culinary genius mad scientists at Cook's Illustrated have figured out how to boil eggs to perfection, every time, no matter how many you want to cook.

They're another easy thing to make if you're entertaining for breakfast. And so delicious.

Buttermilk Scones
Yield: 8 scones

Ingredients:
  • 1/2 cup buttermilk plus some for brushing the scones before baking
  • 1 large egg
  • 1/4 cup brown sugar
  • 1 teaspoon vanilla extract
  • 2 1/4 cups cake flour (not self-rising)--I used this substitution (and I love Joy's blog in general)
  • 1 tablespoon double-acting baking powder
  • 1/2 teaspoon baking soda
  • 1/2 teaspoon salt
  • 3/4 stick (6 tablespoons) cold unsalted butter, cut into bits
  • 1-2 cups add-ins (dried fruit, nuts, chocolate)
  • zest of citrus fruit or extra extract (almond? coffee? make it yours!)
  • coarse sugar for sprinkling
Method:
  1. Preheat oven to 400°F.
  2. In a bowl whisk together buttermilk, egg, brown sugar, and vanilla until the mixture is combined well. 
  3. In another bowl stir together flour, baking powder, baking soda, and salt. Blend in the butter until the mixture resembles coarse meal, using a pastry cutter, food processor, fingers, cheese grater on frozen butter (I love this trick), whatever. 
  4. Stir in add-ins, flavorings and buttermilk mixture until the mixture just forms a sticky but manageable dough. Knead the dough gently for 30 seconds, pat into a 3/4-inch-thick round, and cut into 8 wedges. 
  5. On an ungreased (or silpat/parchment/foil-lined) baking sheet brush wedges with buttermilk and sprinkle with sugar. Bake 15 to 18 minutes, or until the scones are golden.
  6. Serve with whatever scone-condiments you please!
Adapted from Epicurious.

Super Easy Soft Boiled Eggs
Yield: as many as you want!

Ingredients:
  • eggs
  • water
Method:
  1. Boil half an inch of water.
    Add in as many eggs, straight from the refrigerator, as you want to cook. 
  2. Put the lid back on and set a timer for 6 1/2 minutes, keeping the pot on high heat until it comes back to a boil (which should happen quickly). 
  3. Pull eggs out of the pan (tongs help), peel by cracking the fat end and peeling under cool water, slice in half and serve with salt and pepper.

Sunday, November 18, 2012

Cambridge!

Yesterday, Yale fought valiantly against Harvard in their 129th "The Game."

It was close. There were fumbles and field goals. Tough luck and touchdowns.

And ultimately, Harvard won. Truth is, neither of our teams is very good, but since the game was so close, it was super exciting to watch!

So, I was in Cambridge, supporting Yale. A couple of tidbits from my 24 hour trip:


Look at this banner I saw walking around...I'm not the only one who's thought of that pun.
That's okay, not everything has to be original.

You want to hear something else unoriginal?
You do?
Banana
banana
banana
orange
orange who?
orange you glad I didn't say banana?

Well that was an awkwardly one-sided riddle.

Also while in Cambridge, I got to finally see my friend Skylar again, whom I hadn't seen in over a year. I am so thankful we had the chance to reconnect in person!
It's great to be able to keep in touch over Skype and the facebooks and such, but as my friends and I spread out over the country for college, being able to see each other in person is such a luxury!

She took me to her favorite brunch place in Cambridge, Cafe Luna.
The owner even recognized her name, that's how much she likes this place. And I can see why.


I had this chocolate stuffed french toast with sauteed bananas and walnuts, and it was out of this world.

Two pieces of brioche, very lightly battered (I have to admit, usually I'm a fan of denser, more custardy french toast but this variation was very good) with chocolate between the layers, and a huge pile of buttery bananas and walnuts on the side.

Oh, and a chocolate drizzle.
Decadent and amazing, let me tell you. Skylar's pumpkin pancakes were fantastic too...we shared bites, because that's what friends do!

Make a reservation for brunch if you're in the area. I highly recommend it!

Saturday, October 27, 2012

Cornmeal Molasses Pancakes

Being home for break means all kinds of things regarding eating.
It means homemade apple pie,
sourdough bread,
cookies (my dad put hazelnuts in them this time and made them HUGE),
meals that look like a poultry, a starch, and a veggie or two (delicious, but so different from the dining halls),
sandwiches,
and making pancakes!!


These pancakes are flavored with nutty cornmeal and a smidge of sweet, homey molasses. It's like cornbread in a soft pancake form.

Do you put syrup or honey on your cornbread? That's what these taste like. Except a greater syrup to bread ratio.

They're simple to throw together and more exciting than plain old buttermilk. There's some substance, something to make you feel like you really have eaten as much as you have.


Make 'em with your family, make 'em by yourself.
We froze the extras (let them cool off on a paper towel lined plate before freezing so they don't get water/ice crystal-logged) with wax paper between the layers, and a round in the toaster warmed them up just like new.

A word of advice: use butter to fry these. It's worth it.


P.S. Since I'm home, I've been doing some baking, too: Pumpkin Bread and Molasses Crinkles!

Cornmeal Molasses Pancakes
Yield: 16 pancakes

Ingredients:
1 large egg
1 1/4 cups buttermilk (or 1 tablespoon vinegar and enough milk to make 1 1/4 cups)
1 tablespoon unsulfured molasses
1 teaspoon vanilla extract
1/4 cup (1/2 stick) melted butter, cooled but if you're impatient that's ok
1 cup all-purpose flour
1/2 teaspoon salt
1/2 teaspoon baking soda
2 teaspoons baking powder
1/2 cup yellow cornmeal
butter for griddle

Method:

  1. Whisk together egg, buttermilk, molasses, vanilla, and butter.
  2. Whisk together flour, salt, baking soda, and baking powder.
  3. Add buttermilk mixture to flour mixture and stir until just combined. Add cornmeal and stir until just combined. It's okay if it's still a little lumpy.
  4. To cook the pancakes, heat griddle to 375 or heat a pan on the stovetop. Add a bit of butter, then dollop the batter by scant quarter cups and smooth flat. Flip when bubbles appear (cook about 1-1.5 minutes per side)


Monday, September 3, 2012

Breakfasts in the Dining Halls

I've been MIA. At least from this blog.

It all started when I went on a farm for a week. See, I'm just starting my freshman year at Yale, and I chose to do a pre-orientation program where you go work on an organic farm for a week before starting school (given my interest in food, it was a duh). It's a nice way to get to know a small group of people before the craziness begins.

It was amazing. Our farmer would stand around telling us our tasks for the day, munching on a carrot he literally just pulled from the ground.

And hey, if there's dirt on it, at least it's organic dirt!

The produce was amazing, so fresh and flavorful. Tomatoes were especially good, since August is prime time for tomatoes, but we did get tired of them after a while. Squeezing half rotten ones for sauce didn't exactly help...

It was super interesting to learn about the policy side of organic, too. We would ask questions as we worked, and it turns out that a lot of farmers get a certain types of cancer because they're exposed to the chemicals (fungicides, insecticides, and herbicides) they spray on their plants first hand. Our farm was a family farm, so it was really nice that they don't spray, especially since their daughters run around and help out all the time.

Anyway, now I'm settling into college life, eating in the dining halls. Since there's so much food around, there hasn't really been a need to bake (other than that innate insane desire to go make something in the kitchen).
But food prepped by someone else doesn't have to be the end of creativity! This is what I ate this morning for breakfast:

Apologies for the iPhone picture quality
The oatmeal is great! Get creative with the toppings...today I found out the ice cream toppings were still available--boo ya--and proceeded to put heath bar bits on my oatmeal, along with some peanut butter. Good choice.

You like the strawberry sauce for the pancakes? It would probably be delicious on oatmeal or toast or cheerios too! Or a bagel with cream cheese.

And this was my second breakfast/brunch/breakfast-for-lunch:


You can make your own waffles, which is super easy since the waffle maker is all ready and so is the batter. They're pretty good, sort of on par with hotel buffet waffles. They make excellent lunch :)

I also got some spinach salad with marinated mushrooms and balsamic vinegar, a mealy peach which I promptly exchanged for a kiwi after taking one bite, and some pretty good sausage. It was on the fatty side, but the outside was nice and crispy.

Kind of a long post, but there was a lot to say! More to come, probably more dining hall creativity reports and maybe some cookies (I have access to a kitchen!).

See ya soon!

Saturday, June 23, 2012

Pumpkin Pecan Muffins

This is how my morning started:

Mistakes: It could be that the purpose of your life is only to serve as a warning to others.
And this is how it ended:


Thank goodness.

Because I'm weirdly obsessed with food, I couldn't sleep last night for all of the substitutions and details and anticipation of today's recipe.

It comes from a dear baking friend, Mrs. L. Mrs. L is pretty much the bomb when it comes to cookies and muffins, and she shared her recipes with me as a graduation present.


I have been itching to make something from her collection...but we've had plenty of desserts lately. "Okay, so muffins!"
I reiterate. We've had plenty of desserts lately.

So, there are lots of changes I made to the original recipe, some out of desire for health, some out of curiosity about a new ingredient, but I've included both recipes, because the full fat/sugar way is guaranteed delicious. Approved by Mrs. L.


Let's talk ingredients. Chia seeds. I've been freakishly intrigued by them. Each tablespoon offers up 60 calories: 3 g fat (most or all Omega 3s), 3 g protein, and 5 (yeah you read that right) g of fiber. It's crazy, right?


Plus, the omega 3s are available to your body without grinding the seeds.

They're the new superfood. But they have legit nutrients to back it up.

And here's another cool thing. Put liquid on them and they soak it up to make a gel. People make pudding out of it!


So these muffins use chia gel in place of the eggs in Mrs. L's recipe. 1 tablespoon of seeds plus 3 tablespoons of liquid makes the equivalent of a large egg. And since you can use any liquid, I chose orange juice (which also meant I got to decrease the amount of sugar, since OJ is sugary).

Let's get those Beta Carotenes!!
Wait. What kind of healthy person just invaded my fingers and made me type that??


Orange is a nice flavor to complement pumpkin...but honestly the citrus flavor wasn't super detectable with the amount I used. If you're into it, add some orange oil, extract, or zest. Or make an orange glaze with OJ and powdered sugar!

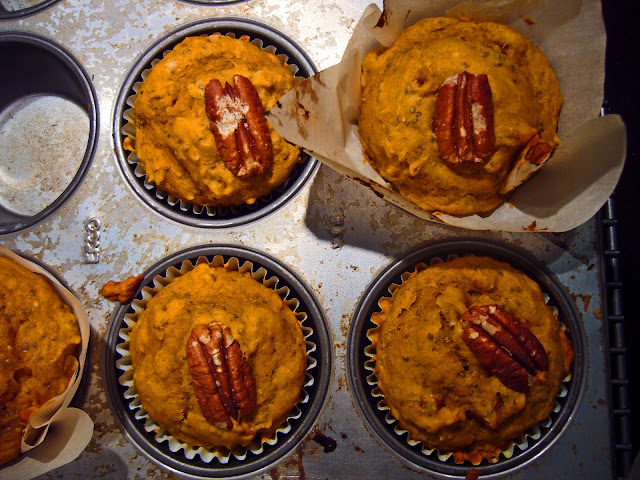
Anyway, these muffins tasted excellent! They were moist and bursting with pumpkin-y flavor. I didn't add cloves or holiday spices like that, since it's summer, but you could for a more seasonal muffin around the holidays.

Pumpkin Pecan Muffins
Yield: 18 muffins

Ingredients:
1 cup (7 oz) granulated sugar                       OR       1 1/2 cups (10.5 oz) granulated sugar
1/2 cup (4 oz) vegetable oil                          OR       1 cup (8 oz) vegetable oil
     plus 1/4 cup+2 tablespoons
        (3 oz) greek yogurt
1/4 cup chia seeds                                       OR       4 eggs
     plus 3/4 cup orange juice, mix with a
        fork to gel
1 1/2 cups (7.5 oz) all purpose flour             OR       3 cups (15 oz) all purpose flour
     plus 1 1/2 cups (7.5 oz) white whole
         wheat (or whole wheat pastry) flour
1 teaspoon baking soda
1 1/2 teaspoons baking powder
1 teaspoon cinnamon
freshly grated nutmeg                                   OR       add 1/2 tsp ground ginger and ground cloves
1/2 teaspoon salt
1 15 oz can of pumpkin
1 cup pecans, chopped (preferably toasted unless you burn them like I did...), plus 18 whole for topping

Method:

  1. Preheat oven to 350 degrees (toast nuts while it's preheating) and line your muffin tin with baking cups or parchment squares.
  2. Mix sugar, oil, and yogurt (if using). Add chia gel or eggs and mix to combine.
  3. Dump in flour(s), baking soda, baking powder, spices, and salt. Fold to combine.
  4. Add pumpkin and pecans and mix again (if too thick, add up to 1/4 cup milk, or OJ if you're vegan).
  5. Spoon into muffin tins, top with a whole pecan each, and bake for 26 minutes (25 for original recipe), or until toothpick comes out clean.
Enjoy! And a big thank you to Mrs. L for sharing her wisdom and love of sweets :)

P.S. The ingredient list just looks long because I have a crazy plotting food brain. I promise, these muffins are a throw-it-in-one-bowl and bake affair.