Showing posts with label bread. Show all posts

Monday, December 22, 2014

Popovers

POP!

Pop goes the weasel!

Pop on over for a spot of tea, love!

I gave my peonies a bit of water, and they popped right back up.


All good things pop. Bubble wrap. Impatiens seed pods. Popcorn. The fanciest of Christmas cards. A splash of color with that dashing pocket square. What some people call soda. 

These popovers are among the better things in life. Crunchy on the outside, stretchy and soft on the inside, with big holes for marmalade. A short list of ingredients, combined in a blender. 


I will admit, I kind of messed these up. I didn't have faith that they would pop because they were hard to fill evenly, and the oven wasn't the right temperature (my fault), but lo and behold, they popped and were lovely.

Thank you, Mom, for ensuring me that they would pop. You were, as always, right.

Merry Christmas! Happy Hanukkah! Joyful Holiday Season!

It's the star on top of the Christmas tree!
Make these for family, make them when you want to feel impressive. Make them when you need to pop! 

Popovers
Yield: 6 popovers or 10 popovers made in a muffin tin

Ingredients:
  • 2 large eggs
  • 1 cup milk (original recipe calls for whole milk, but any will do)
  • 1 cup (5 ounces) flour
  • 1 tablespoon butter, melted
  • 1/2 teaspoon salt
  • vegetable oil for the pan
Method:
  1. In a blender, blend eggs and milk until smooth. Add salt, flour, and butter and blend again until smooth and bubbly. Scrape down the sides of the blender to make sure no flour lumps are stuck, then blend again and leave to rest on the counter for half an hour.
  2. While the batter is resting, preheat the oven to 450 degrees. Put a half teaspoon of oil into each cup of the popover pan or the outer 10 cups of a muffin pan. During the last 10 minutes of resting the batter, put the pan (with the oil in it) into the oven to heat through. 
  3. Quickly, take the pan out of the oven and fill the cups evenly (just the outer ones if you're making these in a muffin tin). This is tricky, so work carefully and start by underfilling. It can help to pour the batter into a measuring cup with a spout before filling. 
  4. Bake for 20 minutes, then turn the heat down to 350 degrees without opening the door. By this point, the popovers will have popped! Bake another 15 minutes at this lowered temperature, or until golden brown. Turn out onto a wire rack and let cool slightly before serving with jam, marmalade, or simply plain.

P.S. I also highly recommend these cookies from Joy the Baker!


Thursday, August 8, 2013

French Bakery Tour

I had the good fortune to be able to hang out with Stéphane, the baker at the bakery in Puynormand. It a tiny town near Bordeaux, and my friend's grandmother lives there, so I visited for a few days with her family!

Fancy breads he made just to show us the possibilities...whoa.
We got there around 8:30 am, and he was just pulling some baguettes out of the oven. Everything happens so quickly there--blink your eyes for a second and you'll miss it. (We actually did, though. Later in the visit he showed us pictures from the workshops he's done, and before we knew it, he had taken all of the bread out of the oven).


The hot baguettes, still crackling, are taken next door to the store to be sold or put on a truck to sell in other villages. Stéphane's wife runs the store, and he has one other guy helping out in the bakery. The bread is some of the best I tasted all summer.


Then, he takes us through the process of making the dough. There are two kinds: one more rustic and the other a softer, more common flour used for basic baguettes. They produce different types of bread, too: the rustic one has bigger holes (the better to slather with butter!).

Basic baguette on the right, traditional dough on the left.
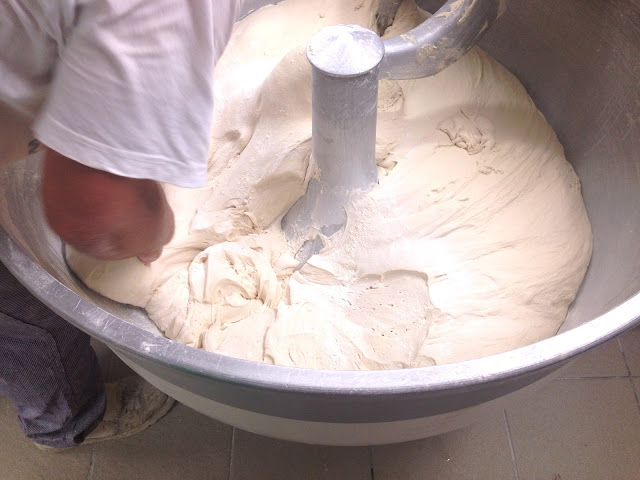
In any case, he starts with just flour and water, and works that for a while (to develop flavor). Then yeast and salt goes in, and the machine does its magic.

I want to curl up and sleep in this cloud
He uses two kinds of yeast, one that's alive and one that's completely dead. Dead, you say? Yes, dead. It doesn't make the dough rise. But after the government started regulating what could go in bread, this replaced (I think) soy lethecin. Or something else. I can't remember, but it was a chemical additive, and the dead yeast does about the same thing without adding another ingredient. It's a great loophole solution.


The dough is then measured by weight into the proper quantity, put in a machine to cut it into 36 exactly equal pieces, roughly shaped and sent to hang out for a while.


Stéphane then takes the little dough babies and rolls them into adult size baguettes, leaving them to rest seam side down on huge trays separated by the folds in big sheets of canvas. He showed us how to do it by hand, but usually a machine does it.


This dough rises overnight in a special fridge that gradually lowers the temperature to about 5 degrees C and then raises it to 6 or 7 degrees. It's super complex and fancy. Not a "try this at home!" kind of thing.

He makes some special loafs each day. These are batards with a nubbly surface!

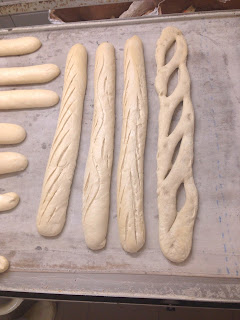
He also showed us ways to create the signature pattern on top--an odd number of diagonal cuts. Never even. My friend and I tried our hands at it, and it's evident that he's really practiced at it, and we're really not. Oh well, it was fun, and practice makes perfect!

My two up on top, and my friend's on bottom. Umm, one long cut? Yeah, I thought it was just practice.
Normally, he just makes the traditional pattern.


But he also showed us a pattern that is leaves, one that makes these bulbs, one with holes all down the line, one called a sausage (many shorter diagonal cuts close together), and one with a diamond pattern created by cutting two sets of diagonal lines. Some of these designs are traditional, others are his unique creations made for workshops and contests. They're beautiful.


It was such a cool morning. I loved seeing the craft and artistry that goes into bread-baking, but also the science and exactitude. I gotta get my hands on some yeast and get over that fear.


This video shows one of his original designs, a braid on top of a regular loaf. It's incredible to me how fast he makes it and how beautiful it turns out!


That's the final product. Whoa, right?

They look so cozy, just like the people who are going to enjoy the warm crackly bread in a little while.
P.S. I'm home now, and my dad made rye country bread. Amazing. Different, but every bit as amazing as french bread. And accompanied with a side of waiting in a house that smells of warm yeasty sustenance.